
Danish Burekas: A Layered Love Story
- Ofer Bar-Lev
- Nov 17, 2025
- 7 min read

If the name of this blog hasn’t made it clear already — I’m a carb person. There are very few carbs in my life that would ever earn the dubious title of a “bad carb,” but I do try to enjoy them within a balanced and sensible diet — mostly to keep myself (and my weight) in check.

In general, baked carbs are my Achilles’ heel — especially when it comes to savory pastries made with puff pastry. Here in Denmark, people tend to make mostly sweet puff pastry desserts, and maybe that’s why I find myself missing the burekas I grew up with in Israel so much.
The burekas I know and love evolved from the Balkan versions of borek that made their way to Israel — first through the Ottoman Empire and later through Jewish immigration from the Balkans. It’s a small pastry made with buttery or margarine-rich puff pastry, brushed with egg and sometimes sprinkled with sesame seeds before baking. The filling options are endless, but most often you’ll find warm, gooey cheese inside. Not a cheese lover? Don’t worry — there are plenty of other variations, from vegetables to meat.
When I was a kid, back in the 1980s and 1990s, burekas had a larger, “event-sized” version that was often served at weddings and celebrations. That version was filled with meat and typically came with a generic brown sauce that tended to soak into the pastry and ruin its flaky texture. For those who didn’t eat meat, there was always a vegetarian version filled with mashed potatoes. Maybe it was my love of carbs — or perhaps my European roots — but that potato-filled version was always my favorite.
As I grew older and moved to Denmark, I realized there’s a noticeable cultural gap between us and Europeans when it comes to puff pastry. Across Europe, there’s a long-standing tradition of making puff pastry from scratch, while in Israel the norm has always been to buy it ready-made and frozen. Sure, making it from scratch takes time and effort — but to me, that’s a small price to pay for the satisfaction of pulling a perfect pastry out of the oven, made with your very own hands. Not to mention the control it gives you over the quality of what you’re putting into your body.
After studying pastry making, I came to understand the many advantages of making puff pastry at home. That discovery sent me on a mission to find new recipes and ideas to experiment with. Along the way, I developed a real passion for recreating traditional dishes and giving them my own modern twist — and that’s exactly how this recipe was born.
I wanted to recreate the burekas I grew up loving, while also blending it with the local Danish culinary tradition I’ve come to know and appreciate. One of the cornerstones of Danish cuisine is parsley sauce — a silky, white sauce that’s typically served alongside roasted pork and boiled potatoes. Since it’s already a classic Danish accompaniment to potatoes, I knew it would be the perfect match for the filling I had in mind.
These burekas are perfect finger food — ideal for parties or buffets — and they’re seriously addictive! You can enjoy them straight out of the oven; they’re crisp, golden, and impossibly fragrant. Just be careful — the filling is scorching hot, and if you’re not careful, you might end up with a small burn on your tongue. It’s a risk I’m perfectly willing to take — and who knows? Maybe a burned tongue will finally help me speak Danish a little better.
Danish Burekas - The Recipe
Makes about 20 pieces
Ingredients


Dough
400g Unsalted butter, cold and cut into small cubes (0.5X0.5 cm)
400g Plain white flour
1 tsp Salt
200ml Ice water
Filling
285g Potatoes (peeled)
5g Plain white flour
70ml milk
3g Unsalted butter
Salt and pepper, to taste
A handful of fresh parsley, finely chopped
Finish
Additional flour for dusting
1 Egg for egg-washing the pastries
Method
Cut the peeled potatoes into medium-cubes and cook til tender. Drain well and set aside to cool completely.
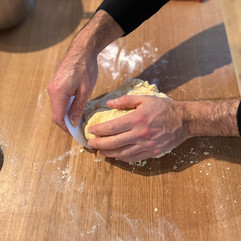
While the potatoes cool, prepare the dough. In a large bowl, combine the flour, salt and butter. Using your fingertips, rub the butter into the flour until the mixture resembles coarse sand with pea-sized pieces of butter.
Gradually add the water and mix with a spatula just until the dough starts coming together a rough, lumpy mass. Transfer to a lightly floured surface and knead briefly until combined.
Shape the dough into a rectangle and roll it out with a straight rolling pin into a long rectangle about 1 cm thick. Keep the long edge perpendicular to you.
Fold the dough like a letter: fold the bottom third over the middle, then the top third over that. Gently stretch the edges if needed so all layers align — this is your first fold.
Rotate the dough 90°. Using a sharp knife, make light scores along the folds so you can see the layers. Roll again into a long rectangle about 1 cm thick.
Fold the dough like a book: fold the top and bottom quarters toward the center so they meet, then fold one half over the other — this is your second fold. Stretch edges as needed to align.
Rotate the dough 90°, score the edges lightly, and roll again to 1 cm thickness — you should now have four layers stacked.
Repeat the letter fold twice more, rotating 90° and scoring lightly each time. These are your third and fourth folds.
Wrap the dough in cling film and refrigerate for 20–30 minutes while you prepare the filling.
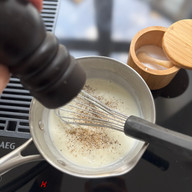
Make the parsley sauce: in a small saucepan, whisk the flour with a quarter of the milk over medium heat until a paste forms. Gradually add the remaining milk and bring to a gentle boil. Lower the heat and cook, stirring, for 5 minutes until thickened.
Add the butter and stir until fully melted. Season with salt and pepper, remove from heat, then stir in the parsley. Set aside.
Drain and mash the cooled potatoes until smooth, then mix in the parsley sauce until fully combined. Cover with cling film and keep at room temperature until ready to use.
Preheat the oven to 170°C (fan-assisted).
Roll out the chilled dough on a floured surface so that the scored edges are perpendicular to you. Roll into a 0.5 cm thick rectangle (larger than 40 × 40 cm).
Cut into squares — use a ruler and pizza cutter to make 10 × 10 cm pieces. Loosen each square gently with a bench scraper before filling.
Place a teaspoon of filling in the center of each square, then fold one corner over the opposite one to form a triangle. Seal the edges tightly.
Arrange the pastries on a parchment-lined baking sheet and brush generously with egg wash.
Bake for 25–30 minutes until puffed, golden, and fragrant. If baking multiple trays, rotate and switch their positions halfway through.
Serve immediately — but be careful, the filling will be piping hot!


Tips & Tricks to Make a Difference
This dough uses the rough puff pastry method — a quicker and simpler version of traditional puff pastry. It saves time and effort while still producing light, flaky layers. That said, if you have the time, patience, and energy, you can always make a full puff pastry for even more impressive results. Ready-made puff pastry, available in most supermarkets, is another convenient option — it will save you work, but it won’t impress quite as much as making your own.
You can also make the dough in a food processor, using the dough blade: just pulse in short bursts until the butter is broken into pea-sized pieces. Be careful not to over-process — the dough should look shaggy rather than smooth, otherwise you’ll lose the flaky layers.
Add the ice-cold water gradually — you may not need all of it. The goal is to bring the dough together just enough without making it sticky. A sticky dough will require extra flour later, which can affect the pastry’s texture.
The neater and more squared-off you keep the dough, the more professional your final pastries will look. It takes a little extra effort and may mean trimming some edges, but it’s worth it for those clean, beautiful layers. That said, don’t stress too much — even a “rustic” burekas is still a delicious one!
When using the rough-puff method, you can re-roll and reuse leftover dough scraps to create more free-form pastries — a great way to minimize food waste.
If your kitchen is warm, or if the dough starts to feel soft and the butter begins to leak, pause and chill it (covered) in the fridge. The best time to rest the dough is between folds, when it’s easiest to handle.
You can store the dough, tightly wrapped in cling film, in the fridge for up to 2 days, or freeze it for up to 1 month. When using frozen dough, thaw it overnight in the fridge before rolling.
It’s best to prepare the filling on the same day you bake the pastries. Chilling it can cause condensation, which adds unwanted moisture and affects the texture during baking.
Season the filling generously — even slightly more than you think is necessary — as the flavor will mellow once wrapped in the dough.
You can easily experiment with other fillings such as cheese, mushrooms, or even meat. Try a few variations to get a feel for the right amount of filling and avoid overly wet mixtures, which can make the pastry soggy.
You can freeze the shaped pastries before baking (after filling and sealing, but before egg washing). When ready to bake, simply brush them with egg wash straight from frozen and bake a few minutes longer than usual.

If you’ve had burekas before, you already know how irresistible they are — and if not, this recipe is about to change that.


Comments